Raspberry Pi Auto login using SSH

Raspberry Pi Auto login using SSH. Getting tired of entering the username and password when using Putty. Here is a quick tutorial on how to configure your Raspberry Pi and Putty to access the terminal without the use of username and password. Its a secure login process using SSH.

Please watch this tutorial video
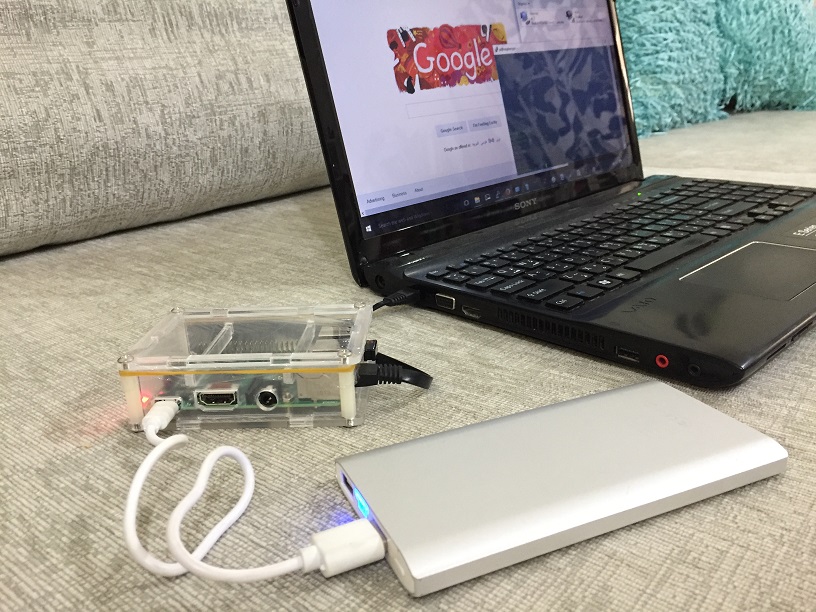

What you need:
Putty
Putty Key Generator
Peagent

Generate SSH key

1. Run Putty Key Generator and click Generate
2. Move your mouse randomly over the blank area till the progress bar finish.
3. [Optional] Once key is generated, under the key comment textbox, add any word you like. Its recommended for you to remember what this key is about.
4. Protect your SSH key by adding a password or any word you’d like under Key passphrase and confirm passphrase. This will serve as your password to the SSH key so please remember it.
5. Click Save Public and Private key to your local drive.
6. For the benefit of many, lets close the Key Generator.

You can still reopen the generated key by loading the private key.
1. Open Putty Key Generator and click Load button
2. Locate the private key file from the folder you saved it. It will require you to enter your passphrase
3. Under Public key for pasting… you’ll see characters starting from ‘ssh-rsa’. This is the key that we will copy later.


Applying SSH key to your Rasberry Pi

Set your Putty to connect to Raspberry Pi


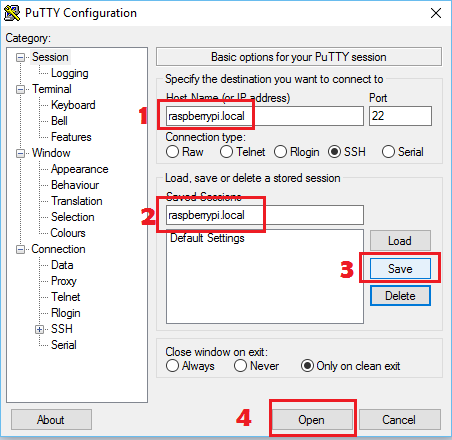
1. On Host name, enter your Raspberry Pi hostname. Default is raspberrypi.local
2. On Saved Sessions, enter any name you want for this session
3. Click Save and Open and login again. We’re not done yet.


Add the public key to the pi user

On the putty console
Ensure that you are in the user home directory
cd

Create .ssh Directory and restrict permission
mkdir .ssh

chmod 700 .ssh

Create authorized_keys file and edit
nano .ssh/authorized_keys

Back to Putty Key Generator. Under Public key for pasting… you’ll see characters starting from ‘ssh-rsa’. Copy this key. Right click in the middle of it and click select all then right click again and click copy

On Putty console, paste the key. Right click in the middle of the console and the key will be pasted. Be careful not to type any thing as it will not work.

Save it by pressing ctrl+o and ctrl+x to exit

Restrict the permissions of the authorized_keys file
chmod 600 .ssh/authorized_keys

Close Putty console.

Using Pageant

Run Peagent. On your systemtray, you can see Peagent. Click it, add Key and locate the folder where you save your Private SSH key. Enter your Key passphrase

Last configuration for Putty

1. On Putty, left side under Category list, click Data. Enter the Username (pi) on Auto-login username
2. Click Session under the Category and Click Save Button
3. Click Open. It should login automatically.

Please remember that auto-login will only work if Peagent is running and private key is added to it.

Reference

0 comments:

How to share Windows internet to Raspberry Pi through Ethernet port

How to share Windows internet to Raspberry Pi through Ethernet port. In this tutorial you'll learn how to share your Laptop's internet to Raspberry Pi using an Ethernet cable.


What you need:

Ethernet cable
Ensure your Raspberry pi Ethernet has no Static IP

Step 1: Find Raspberry Pi Hostname

hostname
The default hostname is raspberrypi. The complete name will be raspberrypi.local

Step 2: Configure your Laptop

Go to your Laptop and open Network Connections and ensure your Ethernet adapter set to automatically obtain IP Address


Share your Laptop's wifi internet


Step 3: Connect to Raspberry Pi using Putty

Plug the Ethernet cable to your Laptop and the other end is to your Raspberry Pi Ethernet port

Open Putty and type the hostname of your Raspberry Pi and add .local at the end. In my RasPi its raspberrypi.local


Login to your raspberry pi using the details below:
Username: pi
Password: raspberry

Finally, check if it has internet connection:
sudo apt-get update

End of tutorial

Kyle Abad


0 comments:

How to share your iPhone's internet to your local network (LAN) using a Raspberry Pi

How to share your iPhone's internet to your local network (LAN) using a Raspberry Pi. This project will make your Raspberry Pi your personalized home router that shares your iPhone internet (or any mobile device) to your Home Network so your Smart TV, Apple TV, Laptop and other devices can connect to the internet by wireless or by Ethernet cable.

About my Raspberry Pi:
  • Raspberry Pi 3
  • Noobs updated
What you'll need:

Step 1: Configure the Ethernet Interface

We have to assign a static IP 192.168.1.1 for Raspberry Pi Ethernet adapter.
To do this, open your terminal and type:
sudo nano /etc/dhcpcd.conf
Add this on the last line
denyinterfaces eth0
Save and exit (Press ctrl + o to save and ctrl +x to exit)

Open interfaces by typing:
sudo nano /etc/network/interfaces

and add this code on the last:
auto eth0
allow-hotplug eth0
iface eth0 inet static
    address 192.168.1.1
    netmask 255.255.255.0
    network 192.168.1.0
    broadcast 192.168.1.255
Save and exit

STEP 2: CONFIGURING DHCP service (dnsmasq)
We will configure the DHCP service so your Raspberry Pi will automatically assign IP for every device plugged in the Ethernet Port.
sudo mv /etc/dnsmasq.conf /etc/dnsmasq.conf.orig  
sudo nano /etc/dnsmasq.conf

Add this code
interface=eth0
listen-address=192.168.1.1
dhcp-range=192.168.1.50,192.168.1.100,12h
server=8.8.8.8
bind-interfaces
domain-needed
bogus-priv
Save and exit

Reboot your device
sudo reboot

USING PUTTY TO CONFIGURE RASPBERRY
Ensure your Laptop Ethernet adapter setting is set to auto obtain IP address. Plug your Ethernet cable to your Raspberry Pi and the other end to your Laptop Ethernet port. Your Laptop should get IP address assigned by your Raspberry.


Now open Putty and type 192.168.1.1(Raspberry Pi IP Address) in Host Name, type any name you like in Save Sessions, click Save and finally click Open.

It will ask you a username and password every time you log in to Raspberry. Use the details below:
Username: pi
Password: raspberry

From here we will use Putty to configure the Raspberry Pi


 STEP 3: Configuring Wifi interface

In this step, we will configure the Wifi setting for the Raspberry to be able to connect to a wifi network. 
sudo nano /etc/network/interfaces

Useful tip: You can just copy codes from your browser and paste it to putty by pressing right click of your mouse inside the putty window.

Paste this code at the end of the line.
auto wlan0
allow-hotplug wlan0
iface wlan0 inet manual
wpa-conf /etc/wpa_supplicant/wpa_supplicant.conf
Save and exit

Set the Wifi password
sudo nano /etc/wpa_supplicant/wpa_supplicant.conf

Paste this code and edit the ssid (iPhone hotspot name) and psk (wifi password)
ctrl_interface=DIR=/var/run/wpa_supplicant GROUP=netdev
update_config=1
country=GB

network={
        ssid="***iPhone hotspot name***"
        psk="***Wifi password**"
        key_mgmt=WPA-PSK
}
Save and exit

Reboot your Raspberry pi
sudo reboot

Check if your Wifi is connected and has internet connection
sudo apt-get update
If it download and update, it means you have internet

STEP 4: SHARING THE INTERNET

 We have to forward the internet connection we got from Wifi to the Ethernet port where our laptop is connected.

Setup IPv4 Forwarding:
sudo nano /etc/sysctl.conf

Un-comment this line by removing #
net.ipv4.ip_forward=1
And lets activate it
sudo sh -c "echo 1 > /proc/sys/net/ipv4/ip_forward"

Lets reset the IP table. Write a script in a file named tablereset.sh
nano tablereset.sh

Paste this code:
#!/bin/sh
echo "Resetting the IP Tables"
ipt="/sbin/iptables"
## Failsafe - die if /sbin/iptables not found 
[ ! -x "$ipt" ] && { echo "$0: \"${ipt}\" command not found."; exit 1; }
$ipt -P INPUT ACCEPT
$ipt -P FORWARD ACCEPT
$ipt -P OUTPUT ACCEPT
$ipt -F
$ipt -X
$ipt -t nat -F
$ipt -t nat -X
$ipt -t mangle -F
$ipt -t mangle -X
$ipt -t raw -F 
$ipt -t raw -X
Save and exit

And run the script
sudo sh tablereset.sh

Add firewall rules, paste the code below one at a time:
sudo iptables -t nat -A POSTROUTING -o wlan0 -j MASQUERADE

sudo iptables -A FORWARD -i wlan0 -o eth0 -m state --state RELATED,ESTABLISHED -j ACCEPT

sudo iptables -A FORWARD -i eth0 -o wlan0 -j ACCEPT

Check the changes we made:
sudo iptables -L -n -v

Save the rules we made
sudo sh -c "iptables-save > /etc/iptables.ipv4.nat"

Lets make this rules loaded automatically every time the system reboot.
sudo nano /etc/rc.local

Paste this code before "exit 0"
iptables-restore < /etc/iptables.ipv4.nat 
Save and exit
Let check the Firewall setting:
route
Here is the Routing table in my Raspberry
pi@raspberrypi:~ $ route
Kernel IP routing table
Destination     Gateway         Genmask         Flags Metric Ref    Use Iface
default         172.20.10.1     0.0.0.0         UG    303    0        0 wlan0
172.20.10.0     *               255.255.255.240 U     303    0        0 wlan0
192.168.1.0     *               255.255.255.0   U     0      0        0 eth0

Let check if this works. Ensure your Raspberry pi is connected to your laptop Ethernet port and Raspberry pi is connected to your iPhone Hotspot. Disconnect your laptop from any Wifi connection. Then browse any website and see if it works.

Step 5: Configuring your router

Your router maybe different from mine. This step don't cover much details. But two thing you must do to your router:

1. Dhcp should be disabled
2. It should not have IP the same as your Raspberry Pi.

If Raspberry Pi and Router has the same IP address (192.168.1.1), it is conflict and will not work. Also only one Dhcp service should run in the network. So ensure the router has no Dhcp running. Remember we configured the Raspberry Pi Dhcp service.
Once all are configure and checked, devices connected through Ethernet cable or through wifi should work.

-Mylinuxcode

0 comments:

Share your Raspberry Pi internet from Wifi to Ethernet Adapter

 
Share your Raspberry Pi internet from Wifi to Ethernet Adapter. This project will make Raspberry Pi your personalized router. It translate the internet connection you get from maybe hotel's internet to your home network.


About my Raspberry Pi:
  • Raspberry Pi 3
  • Noobs updated
What you'll need:
  • Wifi name and password
  • Ethernet cable
  • Putty

Step 1: Configure the Ethernet Interface

We have to assign a static IP 192.168.1.1 for Raspberry Pi Ethernet adapter.
To do this, open your terminal and type:
sudo nano /etc/dhcpcd.conf
Add this on the last line
denyinterfaces eth0
Save and exit (Press ctrl + o to save and ctrl +x to exit)

Open interfaces by typing:
sudo nano /etc/network/interfaces

and add this code on the last:
auto eth0
allow-hotplug eth0
iface eth0 inet static
    address 192.168.1.1
    netmask 255.255.255.0
    network 192.168.1.0
    broadcast 192.168.1.255
Save and exit

STEP 2: CONFIGURING DHCP service (dnsmasq)
We will configure the DHCP service so your Raspberry Pi will automatically assign IP for every device plugged in the Ethernet Port.
sudo mv /etc/dnsmasq.conf /etc/dnsmasq.conf.orig  
sudo nano /etc/dnsmasq.conf

Add this code
interface=eth0
listen-address=192.168.1.1
dhcp-range=192.168.1.50,192.168.1.100,12h
server=8.8.8.8
bind-interfaces
domain-needed
bogus-priv
Save and exit

Reboot your device
sudo reboot

USING PUTTY TO CONFIGURE RASPBERRY
Ensure your Laptop Ethernet adapter setting is set to auto obtain IP address. Plug your Ethernet cable to your Raspberry Pi and the other end to your Laptop Ethernet port. Your Laptop should get IP address assigned by your Raspberry.


Now open Putty and type 192.168.1.1(Raspberry Pi IP Address) in Host Name, type any name you like in Save Sessions, click Save and finally click Open.

It will ask you a username and password every time you log in to Raspberry. Use the details below:
Username: pi
Password: raspberry

From here we will use Putty to configure the Raspberry Pi


 STEP 3: Configuring Wifi interface

In this step, we will configure the Wifi setting for the Raspberry to be able to connect to a wifi network. 
sudo nano /etc/network/interfaces

Useful tip: You can just copy codes from your browser and paste it to putty by pressing right click of your mouse inside the putty window.

Paste this code at the end of the line.
auto wlan0
allow-hotplug wlan0
iface wlan0 inet manual
wpa-conf /etc/wpa_supplicant/wpa_supplicant.conf
Save and exit

Set the Wifi password
sudo nano /etc/wpa_supplicant/wpa_supplicant.conf

Paste this code and edit the ssid (wifi name) and psk (wifi password)
ctrl_interface=DIR=/var/run/wpa_supplicant GROUP=netdev
update_config=1
country=GB

network={
        ssid="***HERE IS YOUR WIFI ID***"
        psk="***HERE IS THE WIFI PASSWORD**"
        key_mgmt=WPA-PSK
}
Save and exit

Reboot your Raspberry pi
sudo reboot

Check if your Wifi is connected and has internet connection
sudo apt-get update
If it download and update, it means you have internet

STEP 4: SHARING THE INTERNET

 We have to forward the internet connection we got from Wifi to the Ethernet port where our laptop is connected.

Setup IPv4 Forwarding:
sudo nano /etc/sysctl.conf

Un-comment this line by removing #
net.ipv4.ip_forward=1
And lets activate it
sudo sh -c "echo 1 > /proc/sys/net/ipv4/ip_forward"

Lets reset the IP table. Write a script in a file named tablereset.sh
nano tablereset.sh

Paste this code:
#!/bin/sh
echo "Resetting the IP Tables"
ipt="/sbin/iptables"
## Failsafe - die if /sbin/iptables not found 
[ ! -x "$ipt" ] && { echo "$0: \"${ipt}\" command not found."; exit 1; }
$ipt -P INPUT ACCEPT
$ipt -P FORWARD ACCEPT
$ipt -P OUTPUT ACCEPT
$ipt -F
$ipt -X
$ipt -t nat -F
$ipt -t nat -X
$ipt -t mangle -F
$ipt -t mangle -X
$ipt -t raw -F 
$ipt -t raw -X
Save and exit

And run the script
sudo sh tablereset.sh

Add firewall rules, paste the code below one at a time:
sudo iptables -t nat -A POSTROUTING -o wlan0 -j MASQUERADE

sudo iptables -A FORWARD -i wlan0 -o eth0 -m state --state RELATED,ESTABLISHED -j ACCEPT

sudo iptables -A FORWARD -i eth0 -o wlan0 -j ACCEPT

Check the changes we made:
sudo iptables -L -n -v

Save the rules we made
sudo sh -c "iptables-save > /etc/iptables.ipv4.nat"

Lets make this rules loaded automatically every time the system reboot.
sudo nano /etc/rc.local

Paste this code before "exit 0"
iptables-restore < /etc/iptables.ipv4.nat 
Save and exit
Let check the Firewall setting:
route
Here is the Routing table in my Raspberry
pi@raspberrypi:~ $ route
Kernel IP routing table
Destination     Gateway         Genmask         Flags Metric Ref    Use Iface
default         192.168.2.1     0.0.0.0         UG    304    0        0 wlan1
192.168.1.0     *               255.255.255.0   U     0      0        0 eth0
192.168.2.0     *               255.255.255.0   U     304    0        0 wlan1

Let check if this works. Ensure your Raspberry pi is connected to your laptop Ethernet port and Raspberry pi is connected to a Wifi that has internet. Disconnect your laptop from any Wifi connection. Then browse any website and see if it works.

If you plan to connect your Rapsberry Pi Ethernet to a router, please consider these two important points:
  1. The Router IP address should not be 192.168.1.1
  2. The Router Dhcp service should be disabled
If Raspberry Pi and Router has the same IP address, it will not work. Also only one Dhcp service should run in a network. So ensure the router has no Dhcp running. Remember we configured the Raspberry Pi Dhcp service.


0 comments:

How to install Raspberry Pi operating system [NOOBS]


How to install Raspberry Pi operating system Noobs. In this tutorial, we will going to use a Windows 7 computer. You can also watch the video of this tutorial.


What you'll need:

Step 1:
Download the Noobs image from their website. Later at step 4, you have to extract this file, copy and paste all extracted files on your SD card.

Step 2: 
Download the SD Card Formatter and install it to your computer. Run the software after installation.

Step 3:
Insert your SD card in your computer. Select the drive letter of your SD card. Remember, this process will wipe out your SD card files. Once ready, click format button.

Step 4: 
Extract the Noobs image file. Copy all the extracted files (shown below image) and paste it all on your SD card (root directory).


Step 5: 
Remove your SD card from your computer and insert it in your Raspberry Pi. Please ensure that you have a good power supply for Raspberry. The device require 5 volts with 1amps or more (2amps is recommended.) Use a high quality usb cable in order for your Raspberry pi works properly. Tablet chargers are good choice. Plug your usb charger to power up the raspberry pi.

This screen shows your raspberry and sd card works.
If your screen doesnt show anything, it may have power shortage problem or SD card has no properly installed operating system.

Select or tick the Raspbian and click Install

Click yes to proceed the installation. This may took more than 8 minutes of installation
Click Ok and the system will restart
This is your Raspberry pi Noobs desktop environment

Step 6:
Update your system by pressing ctrl+alt+t to open the Terminal. Type the following command

sudo apt-get update

sudo apt-get upgrade

Congratulation! You have your Raspberry Pi with NOOBS desktop environment.

0 comments:

How to Install Rar in Ubuntu

Open your Terminal by pressing ctrl+alt+t

Copy this code and paste on the terminal

sudo apt-get update && sudo apt-get install rar unrar

0 comments:

Add User and Grant Root Privileges on Ubuntu

Add User and Grant Root Privileges on Ubuntu. This tutorial we will learn how to Add user and grant root privileges so you could send command like a root user. Before starting, you should be logged as root user. Add a user
adduser demo
It will prompt you to enter the user details. Its optional. You can press [enter] till the last to skip Grant root privilege to demo user
visudo
Find the following code and paste the 3rd line
# User privilege specification
root ALL=(ALL:ALL) ALL
demo ALL=(ALL:ALL) ALL
Save the changes by pressing ctrl+o and exit ctrl+x You can now run command as root by using the command sudo following the command. Example :
sudo chmod 777 test_folder
sudo visudo

0 comments:

Create Ubuntu 14.04.4 server on Virtualbox

Create Ubuntu 14.04.4 server on Virtualbox. In this tutorial, you’ll learn how to install Ubuntu server in Virtualbox. It’s easy. You can do it yourself.
You’ll need:

Watch the video to preview how you should install the server:

Now lets get started. Install Virtualbox in your system and open it.
  • Click New
  • Name: MyDemoVM
  • Type: Linux
  • Version: Ubuntu (64bit)


  • On Memory Size, leave default and click next
  • On Hard disk, select Create a Virtual hard disk now and click create
  • Hard disk file type, select VDI and click next
  • Create Virtual Hard disk, select Dynamically allocated and click next
  • File location and size, leave default and click create

Select your VM MyDemoVM and click Settings
  • Click Storage >> Controller: IDE (Empty) >> Optical Drive >> Click the disk on the right
  • Locate your downloaded Ubuntu 14.04.4 server ISO file. This will mount the iso to the drive. Click Ok

Finally, start the new Virtual machine. It should boot to Ubuntu installation


  • Create your password
  • Use weak password? Just select Yes
  • Encrypt your home directory? Select No
  • Time Zone, select Yes
 
 
  • Partition Disks, just leave the default and select continue
  • Write the changes to disks? Select Yes
  • HTTP proxy information. Just leave blank and select continue
  • No automatic updates and press enter
  • On Software selection, just press enter
  • Install the GRUB boot loader on a hard disk, select Yes
  • Finish the installation, select Continue and VM will restart
  • Ubuntu console will load. Enter your username demo and password

0 comments:

Installing Ubuntu Server 14.04.4 online server

Installing Ubuntu Server 14.04.4 online server . In this tutorial, you will learn how to install an online server by using Digital Ocean Virtual private server. This will also cover how to access the Ubuntu server using Putty with SSH configured.

Let’s get started

Register and configure the server

We will use virtual private server. The best service out there I found was Digital Ocean. For only $5 a month, you can have a private server. You will have a full control over it, install a multiple website as you like and many more.

Click this link to register and get $10 credit.
Once you’re logged, under the droplet page click Create Droplet
Under Distributions, find Ubuntu. Select the version 14.04.4 by click the arrow down. Its up to you whether you select x32(32bit) or x64 (64bit). I prefer x64


Choose a size : Select $5/mo. You can upgrade it later if you wish to.
Choose a datacenter region : Select the country closest to your place.
Add you SSH keys : If you have SSH key ready, press New SSH Key and paste you Public there. But if you don’t have idea about it, just leave it. In this tutorial, this section will not be covered. Instead we will install SSH key manually at the end of this tutorial.

Finalize and Create: Choose a hostname. Any name you prefer.
After the droplet is created, the credentials will be send to you email. It will be look like this
Droplet Name: test-droplet
Ip Address: 162.243.171.170
Username: root
Password: aebd02fcf3f39a73

Connecting to your newly created Ubuntu server

Open your Putty and paste the IP Address to the Host name textbox. On Saved Sessions, type MyDemoDroplet and click save.


Click open and a message will pop up, just click Yes.
Login as : root

Copy the password from you email and right click inside your Putty window. This will paste the password and finally press Enter.

Once successfully logged, you will be asked to change your password. Before that, you have to paste again your current password. If wrong current password is entered, Putty will close. If current password is accepted then, you can proceed to enter your new password.


if you wish to change the root password again just simply type sudo passwd root
 

Adding a User

To add a user, copy the below code and paste it in Putty. To paste it, simply right click inside the Putty window.
adduser demo

Give permission to the user
visudo

Find ‘# User privilege specification’. Below root add this line
demo    ALL=(ALL:ALL) ALL
Save it by pressing ctrl+o and exit press ctrl+x
Ensure you have access to the user (demo) directory
sudo chown -R demo /home/demo

Switch to demo user
su demo

Ensure you’re in demo root directory
cd

Create SSH directory
mkdir .ssh

Change permission
chmod 700 .ssh

Create a SSH file named authorized_keys
nano .ssh/authorized_keys
In this file, we will paste the SSH public key. But first we need to create SSH key

Creating SSH Key

Open Putty Key Generator and click Generate

Move your mouse around the window to generate the code. While doing this, the progress bar moves. The faster you move the faster it will finish.

Once finished, on key comment, you can add any word. Its optional. But it’s useful for you to identify this SSH key.

Protect your key by entering Key passphrase.
Click Save private key to your computer, also click Save Public key. Keep this file and never share it to anyone.

Copy the Public SSH key
On the big text box of the Key Generator, you will see long codes starting ssh-rsa …..This is the code we will copy. To do that, right click on that and click Select All. Now right click again and click copy.

Back to Putty again. Right click to it to paste the code. Save it by pressing ctrl+o and exit ctrl+x

Changing the ssh key permission:
chmod 600 .ssh/authorized_keys

Configuring Peagent

This will help you to login to your droplet automatically without asking password. Peagent will use your SSH key as authentication method to access your droplet. This is a secure way to access your server. So just a reminder, never share your SSH key file and your passphrase to anyone.

Run you Peagent software. You will see it in the bottom right of you computer near the clock. Right click it, click add key.

Locate the key where you saved your public key.
It will ask you to enter your passphrase.

*Please remember that auto-login will only work if your Peagent is running and SSH key is loaded.

Testing your SSH

Open your Putty, and select MyDemoDroplet Saved Session and click Load.
On the leftside (Category), find Connection and click Data.

On Auto-login username, type your username demo
Go back to session again (left, under Category) click Save and click Open
You should be seeing the image below. It means Peagent is working

You should be able to login to your server without entering a password

Disable the Root Access

We need to secure our server by disabling the root access. This will block root login to your server. It means you should login to your server using a user you created (demo). Don’t worry after disabling the root access. Once your user account is logged in, you can still switch to root account by typing su root
Lets disable the root access:
sudo nano /etc/ssh/sshd_config
Find the word ‘PermitRootLogin yes’, and change it to no
PermitRootLogin no

Restart SSH service
sudo service ssh restart

Congratulation, you have setup a new online Ubuntu virtual private server.
If you want to use the server to host multiple website, please follow my tutorial about Setup WordPress Multisite on Ubuntu 14.04 with Nigx

0 comments:

Desktop environment for Ubuntu 14.04 server

Desktop environment for Ubuntu 14.04 server This guide will tell you how to setup Desktop environment and a VNC server on an Ubuntu 14.04 server. The server will use a fast lightweight remote service – TightVNC package. After this, the next tutorial will explain how to connect to the server remotely and securely through SSH tunnel.
Prerequisites
  • Ubuntu 14.04 Server
  • Root Privilege

How to Install Desktop Environment and VNC server

First we have to get XFCE, TightVNC Packages. Do the following:
sudo apt-get update
sudo apt-get install xfce4 xfce4-goodies tightvncserver
In this tutorial, we will use demo as user. To add new user, do the following:
adduser demo
Giving permission to demo user:
visudo
Find the line # User privilege specification
Below the line root ALL=(ALL:ALL) ALL , paste the following line:
demo    ALL=(ALL:ALL) ALL
Save the changes by pressing ctrl+o and exit ctrl+x

Login to your user account that will be used to connect remotely.
su demo
Set VNC password
vncserver

Lets start configuring the VNC Server

vncserver -kill :1
mv ~/.vnc/xstartup ~/.vnc/xstartup.bak
nano ~/.vnc/xstartup
Insert this code:
#!/bin/bash
xrdb $HOME/.Xresources
startxfce4 &
Save it by pressing ctrl+o, then exit ctrl+x

Grant executable privilege:
sudo chmod +x ~/.vnc/xstartup
Create a VNC service file
sudo nano /etc/init.d/vncserver
Paste the following code. If you are using different user, please change the line 3.
#!/bin/bash
PATH="$PATH:/usr/bin/"
export USER="demo"
DISPLAY="1"
DEPTH="16"
GEOMETRY="1024x768"
OPTIONS="-depth ${DEPTH} -geometry ${GEOMETRY} :${DISPLAY} -localhost"
. /lib/lsb/init-functions

case "$1" in
start)
log_action_begin_msg "Starting vncserver for user '${USER}' on localhost:${DISPLAY}"
su ${USER} -c "/usr/bin/vncserver ${OPTIONS}"
;;

stop)
log_action_begin_msg "Stopping vncserver for user '${USER}' on localhost:${DISPLAY}"
su ${USER} -c "/usr/bin/vncserver -kill :${DISPLAY}"
;;

restart)
$0 stop
$0 start
;;
esac
exit 0
Save it by pressing ctrl+o, then exit ctrl+x

Now make this code executable:
sudo chmod +x /etc/init.d/vncserver
sudo service vncserver start
Every time you restart your server, you have to run sudo service vncserver start

Some may wish to always do this manually just to save server memory. You can start the vnc service only when needed.

But if you wish to run the service automatically, the step is mentioned in the next tutorial: Remote Ubuntu Desktop Environment using VNC Client

In the next tutorial, we will explain how to connect to the server remotely and securely through SSH tunnel.

0 comments:

Copyright © 2012 My Linux Code