
Create Ubuntu 14.04.4 server on Virtualbox
Create Ubuntu 14.04.4 server on Virtualbox. In this tutorial,
you’ll learn how to install Ubuntu server in Virtualbox. It’s easy. You
can do it yourself.
You’ll need:
Watch the video to preview how you should install the server:
Now lets get started. Install Virtualbox in your system and open it.

Select your VM MyDemoVM and click Settings

Finally, start the new Virtual machine. It should boot to Ubuntu installation


You’ll need:
- Windows Computer (Windows 7 Recommended)
- Virtualbox software
- Ubuntu 14.04.4 server ISO file (32bit or 64bit) Download here
Watch the video to preview how you should install the server:
Now lets get started. Install Virtualbox in your system and open it.
- Click New
- Name: MyDemoVM
- Type: Linux
- Version: Ubuntu (64bit)

- On Memory Size, leave default and click next
- On Hard disk, select Create a Virtual hard disk now and click create
- Hard disk file type, select VDI and click next
- Create Virtual Hard disk, select Dynamically allocated and click next
- File location and size, leave default and click create
Select your VM MyDemoVM and click Settings
- Click Storage >> Controller: IDE (Empty) >> Optical Drive >> Click the disk on the right
- Locate your downloaded Ubuntu 14.04.4 server ISO file. This will mount the iso to the drive. Click Ok

Finally, start the new Virtual machine. It should boot to Ubuntu installation


- Create your password
- Use weak password? Just select Yes
- Encrypt your home directory? Select No
- Time Zone, select Yes


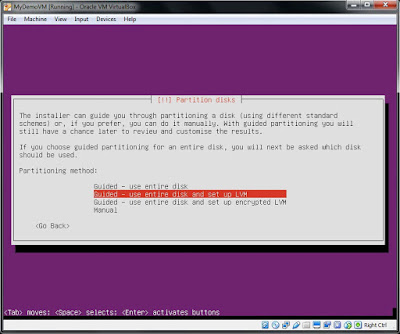
- Partition Disks, just leave the default and select continue
- Write the changes to disks? Select Yes
- HTTP proxy information. Just leave blank and select continue
- No automatic updates and press enter
- On Software selection, just press enter

- Install the GRUB boot loader on a hard disk, select Yes
- Finish the installation, select Continue and VM will restart
- Ubuntu console will load. Enter your username demo and password

0 comments: